Friday, March 26, 2010

Cauliflower manchurian

Ingredients:
For cauliflower
Cauliflower-1/2 head
Allpurpose flour-1/2 cup
Rice flour-1/2 cup
Corn flour-1/4 cup
salt and sugar-1/2 tsp
ajino moto-pinch
Pepper powder-1/2 tsp
Yogurt(curds)-2 tbsp
Oil-for frying
Method
Break into small florets.


Put cauliflower in salted boiling water with 1/4 tsp turmeric powder(optional) and cover.Put off flame.


Drain the Cauliflower after 5 mins.

Mix the flours,salt,sugar,ajino moto,pepper powder and curds and make in to a batter.


Add cauliflower, mix and add water if needed  to make the batter to coat

Deep fry in oil and keep aside.


For the sauce:
Onion-1
Green chilli-2
Garlic chopped-1 tbsp
Capsicum-1
Red chilli paste-1tsp
Tomato ketchup-1 tbsp
 Soya sauce-1tsp
Sugar,pepper powder and salt-1/2 tsp
Cornflour-1tbsp mixed with 1/4 cup water.
Method
Heat 1tbsp oil.Add finely chopped onion,green chilli and garlic,saute
Add chopped capsicum and fry.

Add red chilli paste,ketchup and soya sauce with sugar,salt,pepper powder.mix well.
Add cornflour mixed with water,bring to boil

Add fried  cauliflower,mix well.

Serve garnished wih chopped coariander leaves or spring onion

Wednesday, March 24, 2010

Microwave Jeera Pulao

Jeera Pulao is a famous rice dish from North India.It is a simple and tasty variation.You can enrich it by using butter instead of oil and adding a few cashews as garnish and serve it as such or with any gravy.It goes well with vegetable kurma.Usually rice varieties are served with yogurt based side dishes called Raita and some crispies.


Jeera Pulao is usually prepared with the fragrant Basmathi rice but for a change I made it with brown rice.You can follow the same method with the regular/ Basmathi rice but just adjust timings. [Brown rice takes a longer time to cook].Also the quantity of water used may vary with the variety of rice used.This Jeera Pula was a little chewy but delicious and definitely healthy.

I used:

Brown rice - 1 cup
Jeera / Cumin seeds- 2 teaspoons
Onion-1 finely sliced
Green chillies-3 ,slit
Ginger garlic paste- 1 teaspoon
Curry leaves- a few
Clove-1
Cinnamon- a small piece
Cardamom- 1
Bay leaf-1
Oil- 1 teaspoon
Salt to taste

  1. Wash and soak brown rice for half an hour.Drain and keep aside.
  2. In a large microwave proof bowl,put in oil,cumin seeds,onion,ginger garlic paste,curry leaves, cloves, cardamom,cinnamon and bay leaf.
  3. Mix well and microwave on high for 3 minutes or till onion is translucent.Stir once in between.
  4. Into the same bowl add 3 cups of water,salt and the rice and cover and cook for 20 minutes or till the rice is done.Stir a couple of times in between.
  5. Let it stand in the microwave for 2 more minutes.
Serve as such or with a raita[Raita varieties can be found here] / crispies like pappadam or chips / vegetable kurma .


Piping hot Jeera pulao!!!

Incidentally this happens to be the 200th vegan post in my blog.Do take a look at the other Vegan varieties at Seduce Your Tastebuds.

Happy cooking....


Tuesday, March 23, 2010

Please Help Name This??

Firm Tofu Cubes
Tossed with:
Toasted Sesame Oil
Black & White Sesame Seeds
Sliced Scallions
Red Chile Flakes
Course Sea Salt


This was a winner. Very tasty! But alas, we don't know what to call it...and is it a side dish, or a snack, or what? Your input appreciated.

Lori Lynn
Taste With The Eyes

Sunday, March 21, 2010

Cottage Cheese in Thin Gravy


I've stayed away from thin gravies because I've always wanted to perfect a thick gravy. Most of my thick gravies come from tomato and onion and while they taste good, the looks are less than pleasing, and the effort to make them look good continues. So I surprised myself when I found myself attracted to a recipe of Paneer in Light Gravy from a book on Bengali cuisine that I own, called Pumpkin Flower Fritters.

I also liked this recipe because it calls for using coriander in the cooking, and not merely as a garnish at the end. It's been a while since I did that, and I'm glad I was reminded of it because it really tastes good.

Here's my version of the recipe:

Cottage Cheese/Paneer: 250 gm, cubed
Tomato, chopped: 1 cup
Dry ginger powder OR Fresh ginger, chopped: 1 tbsp
Fresh coriander leaves, minced: 1 tbsp
Bay leaves: 1 big or 2 small

Tempering
Cumin seed/jeera: 1 tsp
Green chilli, slit: 2-3
Garam masala: 1 tsp
Oil: 1 tbsp
Salt to taste

Water: 1/2 cup

In the oil, fry the paneer till light brown and reserve.

Temper the same oil with the cumin. Add the bay leaves, the ginger and the garam masala - make sure all this has been done on the lowest heat.

When it's fragrant, add the tomato, coriander and the green chillies.

Add the salt and saute till the gravy turns red and the tomato is well cooked.

Add the paneer and saute.

Now add the water. Let the paneer soak up the spices.

The books says to serve this with chapatis or luchis (deep fried bread) but I just made a soupy meal of it!

Saturday, March 20, 2010

Soursop Sorbet

Soursop Sorbet

Similar to the pacro water, I had another wonderful discussion with another facebook group member about ice creams and gelatos. One thing he asked was if there anything such a soursop sorbet and that had me thinking for a while. Is there anything called a soursop sorbet? Indeed after much research I discovered that there was such a thing called a soursop sorbet.


So what's a sorbet? Well, for starters, a sorbet is not an ice cream and it usually consists of pureed fruit and/ or fruit juice with sugar and lime or lemon juice added that's frozen or placed in an ice cream maker.


The difference between the two lies in the function of the food and their ingredients. Ice creams are meant to be eaten as a dessert while sorbets are used as palate cleansers between courses or before a main course, hence the intense sweetness sorbets possess. And of course from the ingredients you would notice the other difference: there is the absence of milk.


I believe the serving size of both ice creams and sorbets are also different. Ice creams can be served in larger amounts, but since the sorbet is sweeter only a small amount can be eaten...Then too, if sorbets are served between courses you don't want to fill up on too much anyhow: You have to leave space for dessert :-D. See more about sorbets here.


Sorbets also serve as a healthy alternative to ice cream. Vegetarians (vegans in particular) can enjoy this tasty treat since there isn't any animal products in the ingredients...Who says that vegans can't enjoy themselves too! So, all in all, it's basically simple to make, and a great sweet treat, just like the snow cone, on a hot day like today ( we have had more than 31 days of no rain here in Trinidad). Enjoy my simple soursop sorbet, trini style.
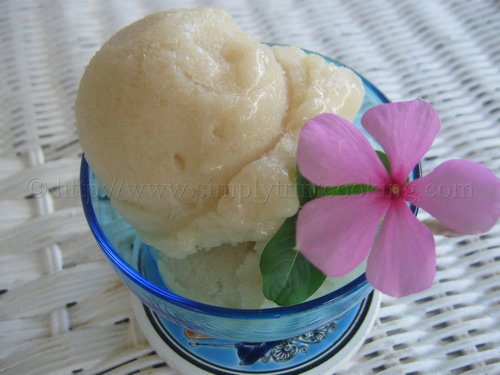


SOURSOP SORBET

2 cups soursop pulp, Seeded, pureed and sieved ( I will show the process)
2 tbsp lime juice ( lemon juice could be used also)
3/4 cup sugar


Peel and separate the seed from the pulp.


Blend with 1 cup of water and place the pulp in a fine strainer or sieve.


Note: Use the back of a pot spoon to press the pulp. This is very labour intensive but worth it!


The finished pulp ready to use.


Add the lime juice...
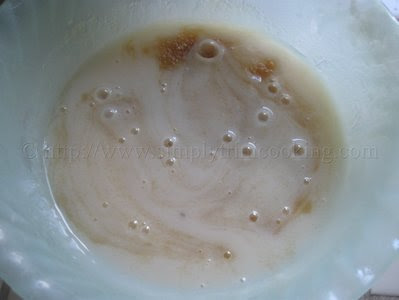


and sugar.


Blend until the sugar dissolves.


Place in a metal baking pan and cover with foil. Freeze until firm (about 3 hours).

Note: Alternatively, you can freeze in an ice cream maker according to manufacturer's instructions.


Let the sorbet soften at room temperature before serving.


Note: For those of you who don't have an ice cream maker, like me, here's what to do. Freeze until firm (about 3 hours) then take a fork and mash the sorbet, then freeze until firm again before serving.


Variations: We added evaporated milk to some, froze it and it tasted like ice cream. You can also experiment by adding rum, grated ginger or another pureed fruit or fruit juice. I can definitely see myself trying some of these variations later on!

More trini recipes to come. Ah gone! :-)


.

Friday, March 19, 2010

Super-easy crunchy spread/dip

Today I want to share this easy spread/dip recipe with you.
It was my breakfast today, with some slices of bread that I made last night.
I used fresh peppers and celery for their crunchiness and health-benefits and also, because they happened to be at home, but you can use any vegetables you like (for example grated carrot!)
If you love spreads like I do, just go wild with the recipe and add or subtract any ingredient you can think of.

You need:


(amount for 1 – 2 people)

Around 100 g of sour-cream, yogurt or cream-cheese
1 red pepper
A bit of white onion (mine was giant, so I used around 1/6)
½ or 1 celery stem
A bit of cheese
Spices to your liking (I used paprika, pepper, nutmeg and sage)
Salt (if you use unsalted sour-cream)

Preparation:


Finely chop the onion, celery and pepper.
Grate the cheese.


Add sour-cream and spices
Mix well and serve as a spread on bread or a dip with “something to dip in” (crackers, chips, carrots or cucumbers cut into long sticks, etc.)


I hope you enjoy it!

Carrot Coconut Chutney

Summer has arrived in India, albeit a bit early at my place.  The heat is overpowering, the sun is scorching and one ventures out of the house, veiled, hatted, or parasoled, to escape the burning rays.  

But along with summer comes the lovely brilliance of colors, dotting the fresh produce markets.  The colors stand vivid: the cheery yellow ripe mangoes, the sober green of watermelons that open up to a luscious pink when cut, the carrots and tomatoes and red onions and string beans all standing out with their individual hues. 

Fluid replenishment takes priority now, more than food as such.  Light meals are the norm, better for digestion in this season.  There's no need to overwork an already overheated body, is there?

Chutneys are an ubiquitous part of the Indian meal.  It no longer matters where you live - in the southern or northern part of the country.  You now find idlis and dosas everywhere, and satisfyingly so.  And a chutney is always present on the side, a constant shadow to the main dish, but with character all of its own.

There's something special about coconut chutneys.  I've never been able to do without them as long as we have a regular Indian breakfast fare at home.  Coconuts are so versatile that you can combine the flesh with nuts of all kinds and even vegetables and herbs in order to improve nutrition, and yet the coconut retains its distinct light sweet flavor. 

For this particular recipe, I've combined carrots with coconut, both to create variety in flavor and also to enhance the nutrition of the dish.  It met with approval at home, and so I share it here at the Great Vega'n Vegetarian Project.  You'll need the following:

  • one medium-sized carrot, peeled (unless very tender or home-grown) and finely grated
  • half a cup of freshly grated coconut
  • one green chilli (or more if you really like spice)
  • an inch of ginger
  • salt to taste (I used a quarter teaspoon)
  • some tamarind pulp (maybe about quarter teaspoon, if you want to offset the carrot's sweetness)
  • mustard seeds (a quarter teaspoon), split black gram (urad dal; a quarter teaspoon), curry leaves (four or five), and a teaspoon of oil for seasoning
METHOD:  Finely grate the carrot.  In a small round-bottomed pan, heat a few drops of oil and coat the pan.  Then warm up the carrot, lightly frying on low heat it till the raw smell and moisture within it disappears.  Keep stirring it so that it doesn't stick to the bottom.  Turn off the stove after about five to eight minutes.  Let this cool


Grate about half a cup of fresh coconut (use frozen only if fresh is not available).  Place the coconut, the carrot, one green chilli, half an inch of fresh ginger, salt, and tamarind extract in the blender jar or food processor.  I tend to add the salt later on out of fear that I might add too much or that I might on a busy day add the salt measure twice by mistake. Add a bit of water and blend the same.  It is best if it is a bit thick in consistency.  However, if it is difficult to blend in the jar, just add water bit by bit till the chutney forms a smooth paste. 


Transfer to a serving dish.  In a small seasoning pan, heat oil on low flame, add mustard seeds and allow them to crackle.  Add urad dal and allow it to turn a golden color.  Turn off the stove and dash in the curry leaves, stirring till they turn crisp.  Then add it to the chutney and mix well.


This goes well with anything: dosas, idlis, bread and sandwiches, chapattis, as a side dish to rice etc.  Go ahead; vary the ingredients as you see fit.  Cooking is always about experimenting.

Thursday, March 18, 2010

A Traditional South Indian Meal

I can't remember the last time I was so excited about something. When I saw Cynthia's blog post about this Great Vegan Vegetarian Project, I knew I had to be a part of it. After all, just about everything I cook and post on my food blog, The Singing Chef is vegetarian. If I were to exclude curd/yogurt from an everyday meal of mine and use only vegetable oil instead of clarified butter, all my traditional meals turn vegan too.

Fortunately for me, I don’t have to think about which dishes to post on this blog. I only have to think of which category of “vegetarian” to post them under. And I have to remember to take pictures of the food I cook. Most of the time, since I’ve already posted something on my blog, I forget to take a picture. Now that I am part of a new blog, I shall remember to do so.

For the last three weeks, I cooked more traditional food than I did in all the time that we’ve been married. And now I really wish I had taken more pictures for this blog. My debut post for the Great Vegan Vegetarian Project is a simple everyday meal that is prepared in my home. This is something that my mother prepared with amazing regularity and never tired of; even though it was rather alien to the stuff she grew up on. Passed on from my grandmother to my mother, and through me to all of you.


Rice is the staple food of Tamil Nadu, one of India’s four southern states. My father belongs to this state and a fair bit of cooking that I do is representative of his family traditions.

On an average day, our meal would be rice, sambar, rasam, curd, and a vegetable dish. On rare occasions, especially when the sambar was not going to be enough for everyone, my mother would make a chutney like preparation called Thogayal/Thuvayal. I make it pretty often, even when there is more sambar than we can eat over two meals.


One of the weekend meals when my in laws were visiting was this Turnip and Onion Sambar, Tomato Rasam, Brinjal Curry and Onion Chutney. Home made curd to mix with rice is always around to end the meal. The recipes for these dishes are on my blog. The only variation to the sambar was the addition of peeled and cubed turnips and the use of regular onions instead of shallots.


Our first course is to mix hot rice with sambar (a thick lentil soup of sorts with tamarind, vegetables and spices) and eat it with the vegetable preparation on the side. Our second course is to mix some more rice with rasam (a sort of clear soup prepared with the water which is used to cook the lentils). This is also eaten with the vegetable preparation on the side. We end the meal with some rice mixed with curd, eaten with a spicy pickle. On days when the chutney is prepared, our first or second course is rice mixed with the chutney and a little bit of ghee or oil.


These meals usually come together in about an hour (including chopping time), usually less and are proof enough that Indian cooking is not as time consuming as one might think. Here is a similar meal that comes together in 30 minutes. The next time you cook for a vegetarian friend, do remember that there's much more to a vegetarian's life than french fries.

Wednesday, March 17, 2010

Semmelknödel (Austrian style bread dumplings) with green lentils

Semmelknödel with lentils are a very classic combo and I, like many other Austrians, grew up with this dish (even though some might combine it with meat or sausages).
Traditionally you use a kind of bread called “Semmel”, but you can really use any hard, dry (old) bread that absorbs some liquid, my mother even made it from whole wheat bread once.
This lentil recipe is far from being anything traditional though, as I used very un-austrian spices and instead of the cilantro I added to the dumplings, one would normally use parsley, but hey, I am in Colombia here :)

Ingredients:

For the lentils:
2 cups of green lentils
4 cups of water
1 tbsp of vegetable oil
1 tbsp of Pickling spice (mustard, coriander and dill seed, laurel chillies, allspice, cloves and fenugreek) or any other spices you like
1 red onion chopped
1 tomato cut in cubes
Mint
Cinnamon
1tsp salt
sage
1 tbsp soy-sauce

For the dumplings:
8 cups hard, dry bread cut in cubes
3 cups milk
cilantro
3-4 cups flour
salt

Preparation:


After soaking the lentils in plenty of water for at least an hour or two (you might want to change the water every once in a while) take two cups full and strain them in a sieve washing them a bit under running water.


Put the lentils into a pot with four cups of water, cover with a lid and bring to a boil, then turn back to medium fire.
Lentils sometimes overflow, if this happens try to open the lid slightly or turn down the heat a bit.


In the meanwhile cut the bread into cubes, or if you have ready-made bread-cubes pour them into a bowl. Add some salt (I used around 1 tsp).


When the lentils are soft (the time it takes depends on how long you soaked them. Here it took around 15-20 minutes) remove them from the heat and strain them. You may want to wash them again, in favor of your digestion.


Heat a saucepan with 1 tablespoon of oil.
When the oil is hot enough add the onion and a bit later the tomato.
Let the vegetables fry for 1 or 2 minutes on medium heat.
Stir every once in a while, so they don’t burn.


Add the lentils and some water, spices and soy-sauce and mix well.


Here it took only around ten minutes until the vegetables were soft and the lentils starchy and flavorful.
You can wait for them to be ready and turn them off, or prepare the dumpling dough in the meanwhile.


Prepare a pot (“the bigger the better”) with lightly salted water. Bring it to a boil.

Add the milk to bowl of bread. Mix carefully, so that all the bread gets soaked, but the cubes don’t fall apart too much.


Add some chopped cilantro leaves and the flour, one half cup at a time, to get the consistency right.
Always take rather too much than too little flour, as too little might make the dumplings fall apart later when boiling. But don’t overdo it, the dough should still be a bit wet and sticky, but not be liquid (you need to be able to shape balls with your hands)


Make sure the water does not boil too wildly, as that might cause the dumplings to fall apart.
If necessary adjust the fire.
Make your hands wet and shake off the excess water, this will keep the dough from sticking to your hands.
Take some dough into your hand and shape it into a round ball, squeezing out eventual liquid.


Carefully drop the dumpling into the water and wait a bit, too see if it falls apart.
If it does, take the ruined dumpling out of the water with a little metal sieve (or any other way you can think of) and add more flour to the dough.
You might feel more comfortable starting out with a lot of flour already, to rule out any chance of this happening.
It is generally hard to predict an exact amount of required flour, because every bread is different and absorbs a different amount of liquid.


When you made sure that the test dumpling doesn’t fall apart after 10-20 seconds add some more dumplings, making sure to wet your hands before shaping every single one of them.
Don’t overcrowd the pot, the bigger it is, the more dumplings you can cook at a time.
You may have to adjust the temperature several times, to keep them in a steady but not too strong boil.
After around 10 minutes they should be ready, but to make sure you can take one out of the water and cut it in half.
In this picture you can see, that in the center of the dumpling, there is still some “raw” part.
If your dumpling looks like this, give the others some extra minutes.


You are now ready to serve!
(In the picture you can see that I served it with slices of raw tomato, some leaves of cilantro and “suero costeño” = coastal style Colombian sour-cream)

  © by Ourblogtemplates.com 2008 Modified by Cynthia Nelson

Back to TOP